

Tile is a perennial favorite for its durability, water resistance, and aesthetic versatility. From the clean lines of a kitchen floor to the intricate design of a shower surround, learning how to install tile floor or wall coverings is a rewarding skill for any homeowner. Whether you’re planning a budget-friendly DIY project or simply want to understand the process before hiring a contractor, this comprehensive guide provides the essential steps, from initial preparation to final grouting.
Planning and Preparation
The longevity of your tile installation hinges on meticulous planning and proper surface preparation. Skipping this step is the most common reason for failure.
1. Calculating Materials and Tile Acclimation
Begin by measuring the total square footage of the area you plan to tile. For flooring, walls, and showers, it’s crucial to purchase at least 10–15% extra tile to account for cuts, waste, and future repairs. This overage is particularly important when working with complex patterns or when tackling the intricate cuts required to install tile in a shower.
For large-format or moisture-sensitive tiles, allow the materials (tiles, thin-set, and grout) to acclimate in the installation environment for at least 48 hours.
2. Preparing the Subfloor and Substrate
The subfloor must be clean, dry, level, and structurally sound. For most floor installations, the surface should not deflect (bend) when walked on.
- Wood Subfloor: A cementitious backer board (CBB) is typically required to provide a stable, water-resistant surface. The CBB is adhered with thin-set mortar and secured with appropriate screws.
- How to Install Tile on Concrete Floor: Concrete slabs are an ideal substrate, but they often require extra steps. Check for moisture, seal any cracks with an epoxy filler, and ensure the floor is level. For best practice, especially in colder climates or large areas, an uncoupling membrane (a mat designed to absorb minor movement) should be installed over the concrete to prevent cracks from migrating up to the tile. This membrane is adhered directly to the concrete with a layer of thin-set mortar.
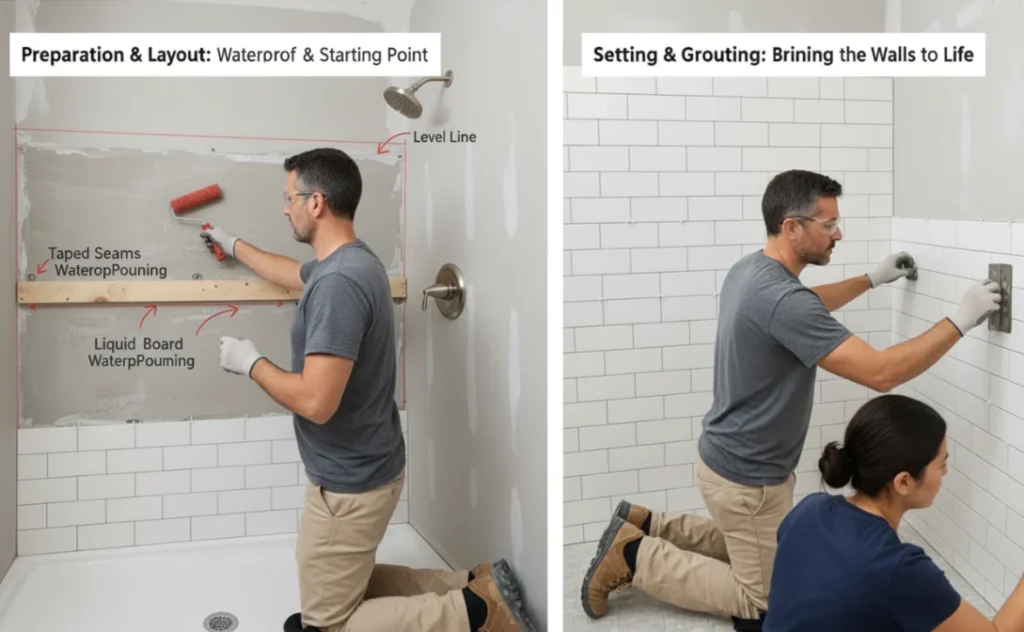
- How to Install Wall Tile & Showers: In wet areas like showers, the wall substrate must be cement backer board or another waterproofing-approved panel. A liquid-applied or sheet waterproofing membrane must be applied to the substrate before any tile setting begins. For a shower floor, you must first create a pre-slope, then apply a final waterproofing layer, and then build a final mortar bed that slopes 1/4 inch per foot toward the drain to ensure proper drainage.
3. Determining Your Layout
An excellent layout minimizes small, unsightly cuts at the edges of the room and maximizes symmetry.
- Find the Center: Mark the center point of all four walls and snap chalk lines between opposite center points to find the room’s true center.
- Dry Layout: Lay a row of tiles (with spacers) along the center lines. This allows you to visually inspect how the pattern will look and where the edge cuts will fall.
- Adjust the Starting Point: If your dry layout shows a very thin tile cut (less than half a tile) along a prominent wall, adjust your starting line by half a tile width. The goal is to ensure the tiles near the walls are at least half a tile wide for a professional appearance.
- Establish a Straight Edge: Use a long level or a straight board (batten) secured to the wall/floor as your starting guide for the first row, especially when installing how to install ceramic floor tile.
Setting the Tile
This is the most critical stage, where you commit the tiles to the adhesive. Work in small sections so the thin-set mortar does not dry out before you set the tiles.
1. Mixing and Applying Thin-Set Mortar
Mix your thin-set mortar according to the manufacturer’s directions, using an electric drill and a paddle mixer. The consistency should be like thick peanut butter.
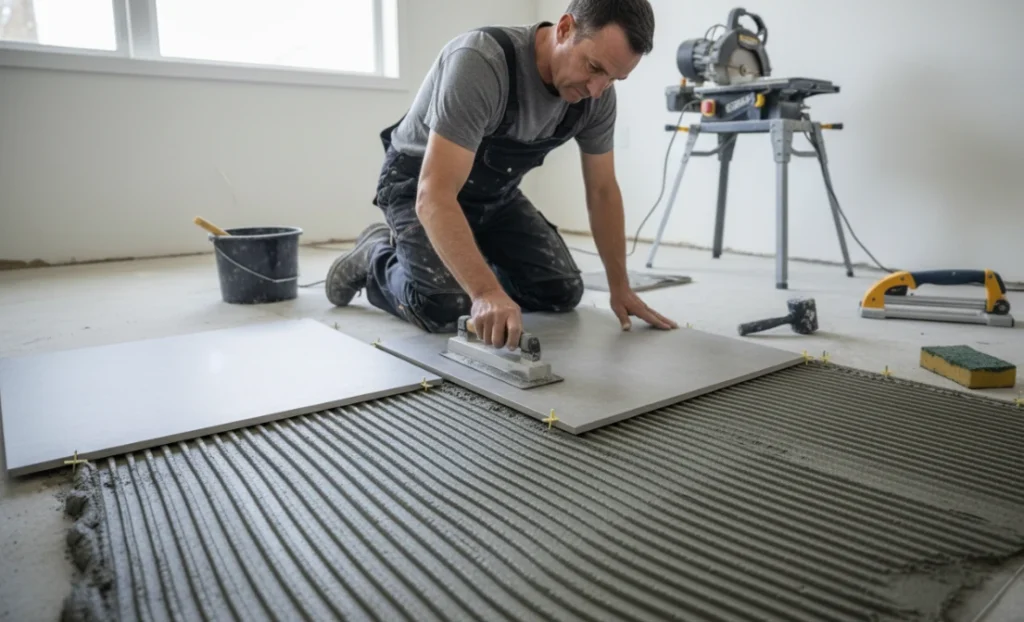
- Apply a Skim Coat: Using the flat side of your notched trowel, spread a thin skim coat of mortar over the section you plan to tile (about 3’ x 3’ area). This ensures a bond between the substrate and the notched mortar bed.
- Comb the Mortar: Using the notched side of the trowel, comb the mortar, creating uniform, parallel ridges. Hold the trowel at a 45-degree angle to ensure the correct depth of mortar. Do not swirl the mortar, as this can trap air.
2. Setting the Tiles
Start at your center point or against your batten line and work outward.
- Back-Butter Large Tiles: For large-format tiles (12” x 12” and up), apply a thin layer of thin-set to the back of the tile in addition to the mortar on the floor. This technique, known as back-buttering, ensures 90–95% mortar coverage for maximum adhesion and structural integrity.
- Set the Tile: Press the tile firmly into the thin-set with a slight twisting motion to collapse the mortar ridges and eliminate air pockets.
- Use Spacers and Leveling Systems: Place tile spacers between each tile to maintain consistent grout lines. Use a rubber mallet to gently tap the tile level with its neighbors. For an extra professional finish, use a tile leveling system to prevent “lippage” (uneven tile edges).
- Wipe Clean: Immediately wipe any excess thin-set from the tile faces and grout joints with a damp sponge before it dries.
3. Cutting the Tiles
Once all the full tiles are set, you will need to cut the perimeter pieces.
- Straight Cuts: Use a manual tile cutter (snap cutter) for straight, clean cuts on ceramic and some porcelain tiles.
- Complex Cuts: Use a wet saw for all porcelain, stone, and complex cuts (e.g., L-shaped, diagonal cuts, or cutting the pieces needed when you install tile in a shower around the drain).
- Holes and Curves: Tile nippers or an angle grinder with a diamond blade are used for small curves or cutouts around pipes and toilet flanges.
Allow the thin-set mortar to cure completely, which is typically 24–48 hours, before moving to the next phase.
Grouting and Finishing
Grout protects your tiles and enhances the finished look. Do not begin grouting until the thin-set is fully cured.
1. Applying the Grout
- Remove Spacers: Remove all tile spacers from the grout joints.
- Mix the Grout: Mix the grout according to the manufacturer’s instructions.
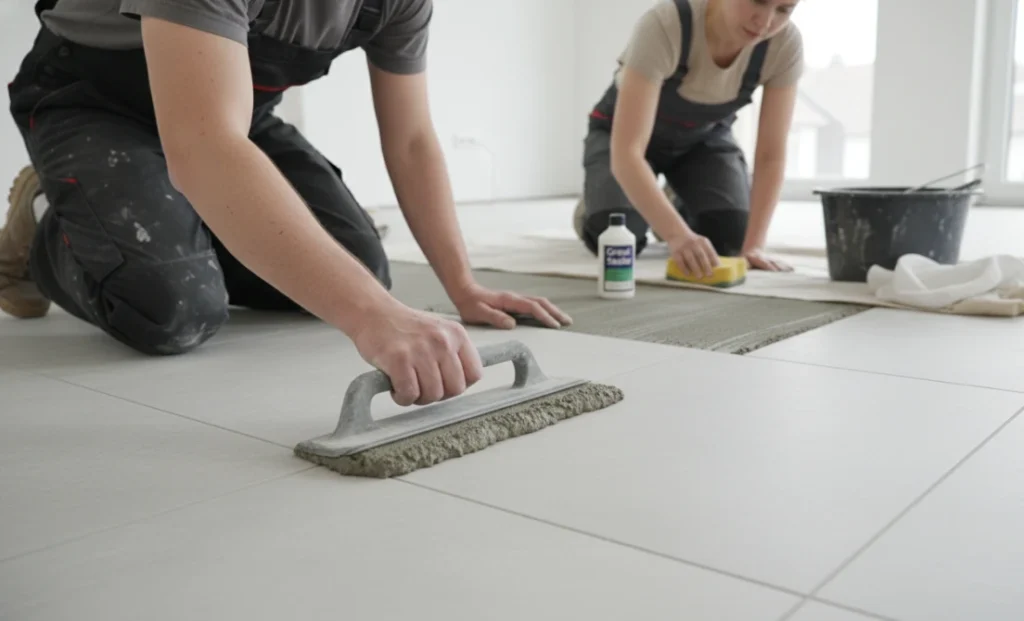
- Spread the Grout: Working in small sections, use a rubber grout float to spread the grout over the tile surface, holding the float at a 45-degree angle. Press the grout firmly into the joints using diagonal passes. The goal is to completely pack the joint with grout.
- Remove Excess: Scrape the majority of the excess grout off the tile surface by holding the float at a 90-degree angle and pulling it diagonally across the tiles.
2. Cleaning and Sealing
- The First Wipe: After 15–30 minutes, when the grout has started to firm up (curing time varies), use a damp (not soaking wet) grout sponge to wipe the surface and smooth the grout joints. Rinse the sponge frequently in a bucket of clean water.
- Removing Haze: After the grout has fully dried (usually 24 hours), a light haze may remain on the tile surface. Use a specialty grout haze remover and a soft cloth to polish the tile clean.
- Sealing: For most traditional, cement-based grouts, allow 72 hours of curing time before applying a grout sealer. This is especially important for areas requiring high moisture protection, like a tiled shower or kitchen backsplash.
Understanding Tile Installation Costs
The total expenditure on your project—or how much tile floor installation costs—depends on whether you DIY or hire a professional, the complexity of the tile, and the material cost. Labor costs can vary significantly based on location and the difficulty of the work, such as intricate cuts for mosaic tile or the extensive prep needed for how to install tile on a concrete floor with an uncoupling membrane.
For those interested in learning how much per square foot to install tile, the general labor cost is a key factor. Professionals typically charge between $4 and $15 per square foot for labor alone, not including the material costs. For a rough idea of professional installation services, you can always reach out to a trusted partner like MK Professional Services for a personalized quote.
| Material Type | Average Material Cost (Per Sq. Ft.) | Labor Cost (Professional, Per Sq. Ft.) | Total Installed Cost Range (Per Sq. Ft.) |
| Ceramic (Standard) | $2.00 – $8.00 | $4.00 – $10.00 | $6.00 – $18.00 |
| Porcelain (Durable) | $3.00 – $12.00 | $5.00 – $12.00 | $8.00 – $24.00 |
| Natural Stone (Marble/Slate) | $8.00 – $30.00 | $10.00 – $20.00 | $18.00 – $50.00+ |
| Glass/Mosaic | $10.00 – $40.00 | $15.00 – $30.00 | $25.00 – $70.00+ |
The Essential Tool and Material Checklist
Having the right equipment is non-negotiable for a professional finish.
| Measurement & Layout | Tile & Adhesive |
| Tape Measure | Tile (with 10–15% overage) |
| Long Level (4-ft or longer) | Thin-set Mortar (Powder) |
| Chalk Line and Pencil | Grout (Sanded or Unsanded) |
| Preparation & Setting | Waterproofing Membrane (for showers) |
| Bucket & Paddle Mixer (for thin-set/grout) | Cement Backer Board (CBB) & Screws |
| Notched Trowel (Size appropriate for tile) | Tile Spacers & Leveling System |
| Rubber Mallet | Finishing & Safety |
| Grout Float (Rubber) | Grout Sealer |
| Cutting | Caulk (Color-matched to grout) |
| Manual Tile Cutter (Snap Cutter) | Safety Glasses and Gloves |
| Wet Saw | Sponges and Buckets |
Conclusion
Installing a tile floor is a rewarding home improvement project that adds significant value and aesthetic appeal to your space. While it demands patience and precision, mastering the steps from surface preparation to the final grout seal will result in a professional-grade finish. For complex projects, such as those that require knowledge on how to install ceramic floor tile or detailed work like setting a new how to install wall tile backsplash, hiring a professional can save considerable time and effort.
To ensure your project is executed with the highest standard of quality and precision, consider reaching out to the experts. You can see examples of our finished work and dedication to quality by visiting our About Us page. For general service inquiries on how to install a tile floor in your home, or for a professional estimate on how much per square foot to install tile, you can easily contact us. For complex installations like laying tile over a concrete slab or detailed wet-area work, including how to install tile in a shower, visit our dedicated Contact page today. Whether you need guidance on how to install tile on a concrete floor or want to discuss how much tile floor installation costs for your specific project, we are here to help.

Leave a comment